Projects on My Plate

  • Veda's Birthday Party
  • Sienna's Birthday Party
  • Sienna's Pencil Skirt
  • Pencil Skirt
  • Wardrobe re-do
  • Floral Skirt for Mommy
  • Breck's Bedding
  • Sienna and Veda's Bedding
  • Apron

Monday, March 29, 2010

Push-In Pie Crust


So I know I don't usually do recipes, but there are a few out there that I have either come up with, or found that have changed my life. Seriously, I will never be the same cook. I love cooking, I mean really really love cooking, so I'm actually surprised I've never ventured into online recipe sharing.

Funny thing is, I love to cook, but I can't stand baking. It's not so much that I can't bake, just that I don't like to bake. The only time I semi-enjoy baking, is when it accomplishes my OCD desires to have a completely coordinating party. Baking just seems so redundant to me... flour, sugar, eggs, butter, rising agent...every single time...then you shove it in the oven. No diversity, and it's messy, then to top it off, offers little nutritional value. Don't get me wrong, I like to eat baked goods; really, I LOVE to eat baked goods, but I never want to go through the mundane, messy and long process just to eat something that's not good for me.

Cooking is just so diverse. Not only are your ingredients limitless, with a change in one spice having the ability to change the entire taste of the dish, but there are so many ways to cook something, all yielding completely different outcomes. You can bake it, sauté it, boil it, steam it, deep-fry it, grill it, or broil it. Then, you get a rounded meal for you and your family, so everyone wins!

When it comes to the holidays, i love cooking big feasts for our family. My dread comes in when I think about the PIES I have to make! And here's my other quirk, I really like doing things from scratch when it comes to the holidays, so I set this standard of pumpkin pie from a real pumpkin, apple (among other fruits) pie not from a can, and of course, homemade pie crust.

I don't know if you guys have ever tried homemade pie crust, but it's a pain. It's not very hard or intricate, but it's just annoying to mix, and everything has to be done in a specific order and time. Speaking of time, it feels like it takes forever too. Like I mentioned earlier, I'm all for not spending a ton of my time baking. You can imagine my delight when I found this recipe.

It's completely from scratch, and takes no more than 3 minutes to make, and you mix it and make it right in the pie pan, so no messy counter, extra bowls, or sore arms from excessive rolling! Perfect! This recipe is good for pumpkin pies, pudding pies, or dutch pies. You can also use it to make quiche, but make sure you cut out the sugar. It's not your best bet to use this for a pie that requires a top, as the texture isn't right to hold as a top crust, but it really makes a yummy (and homemade) bottom crust.

So enough of the rambling... here's the recipe!

Push-In Pie Crust:


1 1/2 Cups all-purpose flour
2 tablespoons sugar (emit for quiche)
1 teaspoon salt
1/2 cup vegetable oil
2 tablespoons milk


1. Place dry ingredients in pie pan (8-9 inch) and mix together with a fork.


2. Slowly add oil, then milk. Kneed with your hands a couple of times to ensure consistency in texture.


3. Starting in the middle, start pushing the crust down to the pan, and work your way out, until there is a thin and even layer of crust on the entire pan.


4. For pudding pies (or a pie that you are just refrigerating, instead of cooking) you need to bake the crust first at 425 degrees for 10-12 minutes. If you are making a pumpkin pie or quiche, just pour filling into uncooked crust, and bake for whatever the recipe calls for.


And that's it! I hope you enjoy this recipe as much as I do. I at least hope you can enjoy the time it saves! Happy baking!!
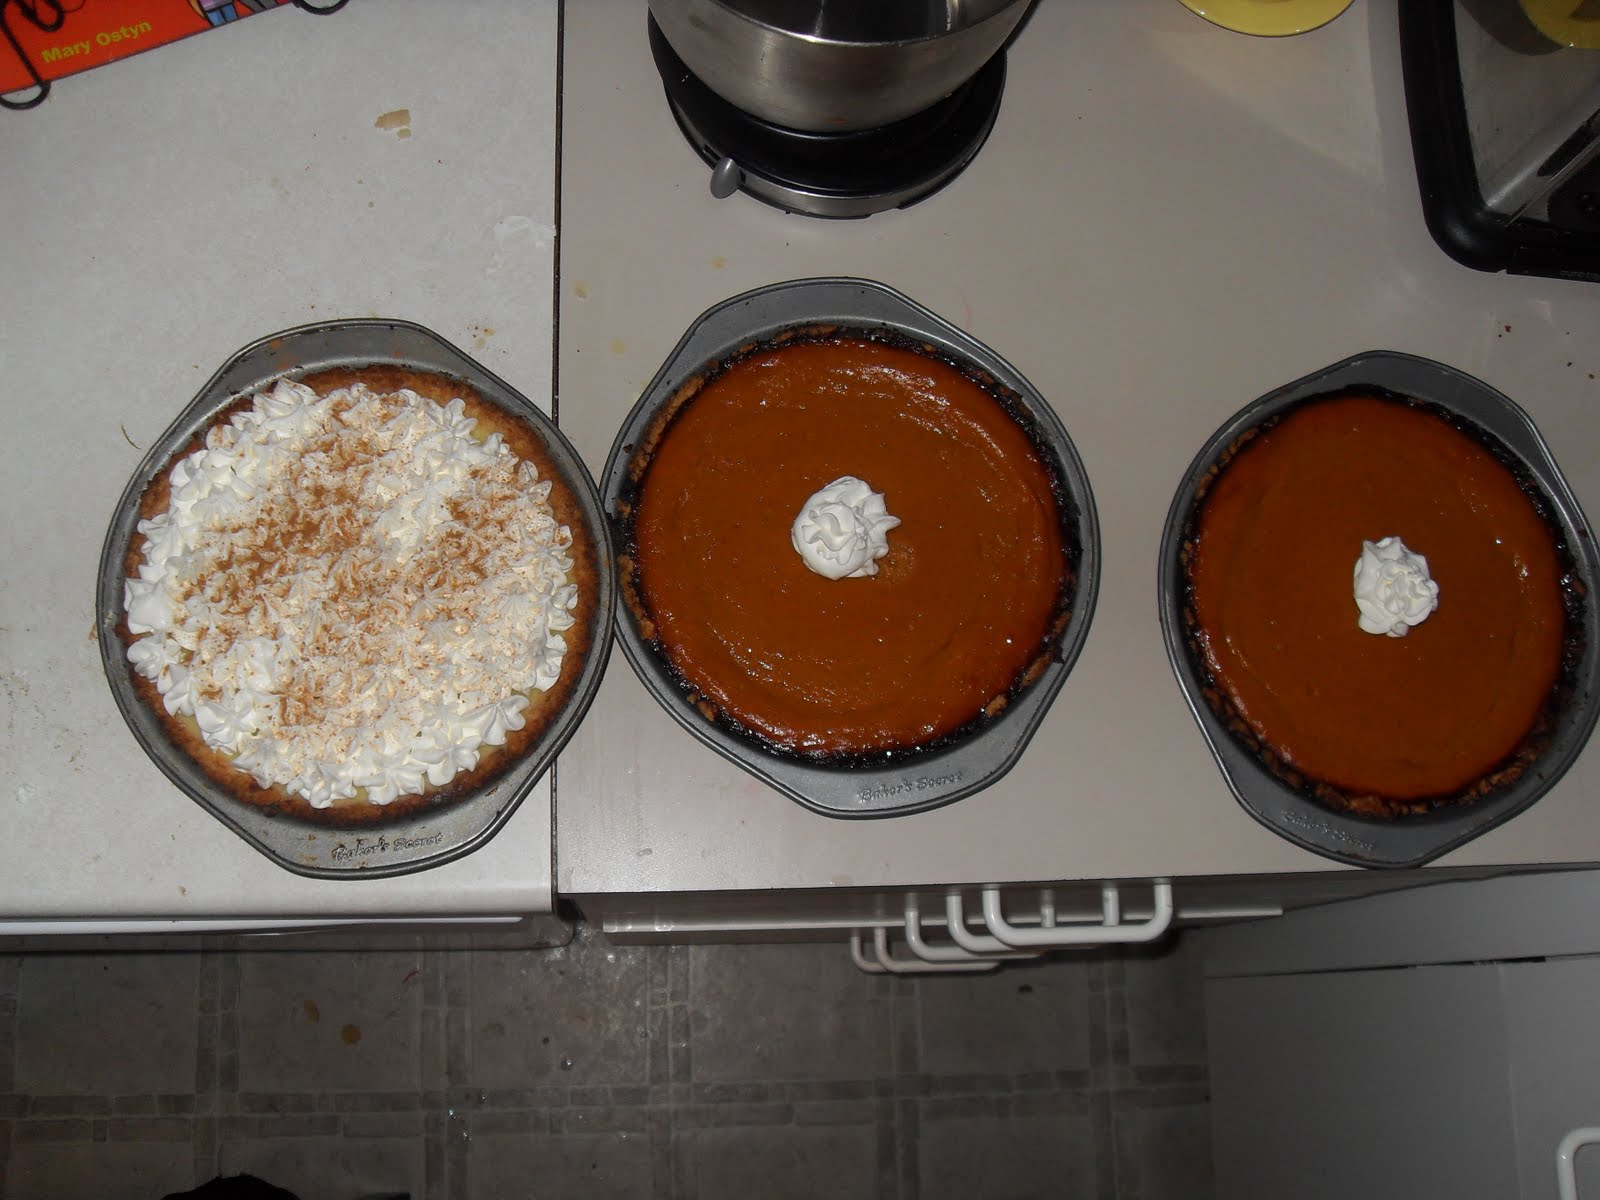
These 3 holiday pies were made with the Push-In Pie Crust!

Love,

Friday, March 26, 2010

At Last...an end result!

I am proud to say that Sienna's room is officially done! I'm sure I'll do little extra crafts for it here and there, but as a whole, it is complete! Here's some photos of my end result:

The Bedding that got the ball rolling...

Followed by the diaper stacker and changing pad cover...

Then...it all got put together!


Things accomplished with the room:
-made bedding
-made mosquito net
-made decorative circles on wall
-made changing pad cover
-made diaper stacker
-made valance
-painted scalloped trim on wall
-made canvas photos
-put up decorative accents and pictures
-made shaggy raggy rug


sigh... now onto Breck's big boy room!

Love,

Wednesday, March 24, 2010

Sienna's Shaggy Raggy Rug (For Reals this time)

This is my 3rd shaggy raggy rug to date, of many more, I'm sure. I enjoy making these, and I think they are just so darn cute! Since my other two rugs I have posted on here are my 1st and 4th posts, I wasn't as good at posting instructions in a clear manner, so I will post a better tutorial now.

What you need:

-7 1/2 yards of fabric (I suggest quilting solids, or light-weight cotton material of any type)
-about 3/4 yard of rug canvas (at most fabric stores, though JoAnn discontinued it)
-scissors
-patience

Step One:
Lay your fabric out and cut strips length-wise that are about 5-6 inches wide.


Step Two:
Once you have a bunch of long strips (all 5-6 inches wide), start cutting those strips along the width, about 3/4 to 1 inch wide. You should have a bunch of tiny strips that are all about 1 inch by 5 inches (approx.).


Step Three:
Cut your rug canvas to size. It should be about 100 squares by 70 squares. If you want a bigger rug, you may need a little more fabric.

Step Four:
Start tying them onto the rug as pictured. A single tie will do, you don't need to double knot or anything. There should be a space in between each tie, and each tie will occupy a hole from two rows. Thus, there will actually be only 50 rows that you are tying, with 35 ties per row.


You can see that each tie occupies two rows of squares. They are staggered with each new row.

Step 5:
Repeat rows, tying the strips into the opposite holes as the previous row, to create a staggered look. This will help it look more filled in.

Repeat this until rug is finished.


For different designs, refer to previous posts about the rugs. For this rug, I made the pink border first, then filled in the brown around it. I used about a yard of pink, and 6 1/2 yards of tan.

Monday, March 22, 2010

Come Celebrate Breck's Birthday Suess Style!!!


Fun party, fun to put together, fun with friends and family....Glad it's over!!!

Well I lied in my last post saying the party was that weekend. It was supposed to be... until we all got sick the DAY BEFORE!!! UGH! So we put it off to the next week to ensure I could handle setting up, germs stayed within our own family, and of course that Breck can actually enjoy his party!

I've had this party planned for over a year, hoping long ago to have it as Breck's 2nd birthday party, then realizing he would never remember it, and wouldn't be able to participate in the activities, I decided to wait until his 3rd birthday. It gave me a lot of time to think up new ideas in addition to the ideas I had originally had, find new ideas online, and prepare and create! Some of my ideas came from this great site that I found amidst all the planning, using Dr. Suess as the theme for a baby shower. I got some of the decor ideas from her!

We reserved the clubhouse at our complex, so we could have enough space for everything and everyone, and it worked out perfect. The rest of the details I'll just let you look through yourselves in pictures, and I'll explain as I go.
The central point of the tables.
The right table

The left table

Pin the Hat on the Cat (and story books to read below)

Station to decorate Sneetch Stars that the kids could pin on their shirts! (Next to it, though I didn't get a better picture, is Max from the Grinch, and just a little over to the right from him was a sled with all the presents on it!) 

The "Who-Ville Skyline". I bartered with an elementary school for the butcher paper. They had pity and gave it to me for free.

"Make a Dust Speck Clover" station from Horton Hears a Who!

McElligot's Pool (Fishing for prizes), and sign.
Books laid out, and presents sled in the background.

I had some pages from Suess books blown up and put them up around the place.

Sorry this is so blurry, but these are the favors. They are bookmarks with Oobleck behind them. I made a bunch of gak, and put it into cellophane bags as oobleck to take home and play with! The bookmark has a poem from the book "Bartholomew and the Oobleck" on it.

Cat in the Hat style Bow ties for the kids to wear in place of party hats!

The Food: Here you see Green Eggs and Ham...(I also made those ball center pieces with Styrofoam balls and wooden skewers)  

This picture speaks for itself

Thing one and Thing two cupcakes, an idea I got from the afore-mentioned site.

McElligots Pool (Jello with Swedish fish inside and on top)
Another self-speaking picture. I drew this little guy, and was pretty happy with how he turned out. I also drew Max (from the Grinch), and the Pin the Hat on the Cat poster.

The cake table


Me reading "Happy Birthday To You!" by Dr. Suess. My little man is in the plaid.

Wednesday, March 3, 2010

Breck's Birthday Invites

I wasn't sure that I wanted to do the whole invitation-before-the-party post like I usually do. But I figured, Why not? They're lots of fun, and I could share with you some of what I did to create them. Plus it gives you a little sneak peak, and the party I'm planning for my little man!


It's a Dr. Suess Party! I drew the cake Suess style, then scanned it onto my computer and filled in the color, and I wrote the invite wording as well.
These were lots of fun! To get the book shape, I created a pattern. I cut an 8 1/2 by 11 sheet of paper, and cut it in half, hamburger style. I then made the book-like trimmings in the middle of the top and bottom, and that was that. I was able to trace that pattern for the rest of the invites.

The pages were a similar process, cutting paper in half, except, I trimmed them up even more to fit inside the book cover.
The dimensions are: 4.5"x7.5" for the bottom page, 4.5"x7" for the middle page, and 4.5"x6.5" for the top page. I then placed them on top of one another as pictured, so the ends hang evenly out. Then I folded them in half where the seem of the book would be. When I opened it up, I cut the curved edges in the middle top and bottom, to give the page effect. After that, I used double-sided tape to keep them in place.

I then cut a ribbon ( however long you want it to hang), and glued it to the back of the pages, BEFORE taping it to the cover. Put double sided tape on the back of the pages, bring the ribbon forward, and tape down to the cover.

I put a dab of glue half-way down the middle of the pages to keep the ribbon in place.

I printed and mounted all of my graphics and wording, and placed them as shown. I put a fun clip on the cat in the hat for style! I them brushed the edges of the cover with red ink.

After all that, I gently curled all the corners of the pages, to give it a used book look.

And there you have your book invites!


Monday, March 1, 2010

Baby Shower Gift

I went to a baby shower this weekend for one of my friends here. I made her some burp cloths, and of course, a hat.


Blog Widget by LinkWithin