Projects on My Plate

  • Veda's Birthday Party
  • Sienna's Birthday Party
  • Sienna's Pencil Skirt
  • Pencil Skirt
  • Wardrobe re-do
  • Floral Skirt for Mommy
  • Breck's Bedding
  • Sienna and Veda's Bedding
  • Apron
Showing posts with label Baking/Cooking. Show all posts

Friday, October 14, 2011

Feed Me Friday: Icky Fingers

Last week's Feed Me Friday, I had featured bread stick bones and blood (pizza sauce). You may have noticed the pictures had another spooky treat next to them, which I am featuring today:

Icky Fingers.

Super easy. All you need are a couple packs of string cheese, depending on how much you want. I have even less than that pictured. You'll also need some blood (Pizza Sauce) and fingernails (almond slices). 

What you're going to do, is first, cut the string cheese pieces in half.

Next, carve two sets of three tiny divots in each one to resemble the wrinkled skin where your knuckles are.

Then, slash a shallow angle at the very tip on the finger downwards as a place for the fingernail.

Attach each finger nail by placing a dab of pizza sauce on the angled tip, and putting the almond sliver on top.

And there you have it, gross, nasty fingers, ready to eat!


Now tell me those don't look like the most appetizing of treats!!!

Friday, October 7, 2011

Introducing: Feed Me Friday

This is something I thought would be fun to do every Friday. I don't usually do recipes on this blog, which is actually really strange because I love to cook. Anyway, I was thinking that every Friday, I could post either a seasonal recipe (whether it is fun crafty holiday food, or using seasonal ingredients), or must have staple recipes in my house. I think this could be fun.

Since it is now October, I want to share some spooky dishes with you this month! The funny thing is, I made these all last year for the week of Halloween, while I was newly pregnant and didn't know it. Halloween was my very first "extremely nauseous" day, and I remember seeing the pictures pop up over and over on my photo screen saver, and almost having to run to the bathroom, sick. Luckily, this year, I see them, and I'm excited to try them again! We're good...no permanent damage.

The first I'll share with you are these creepy bones served with bloooood.

(A.K.A. breadsticks and pizza sauce)

I'm sure you could come up with a much more clever presentation


Ridiculously simple:

1. Buy a package of pre-made breadsticks (I used Pilsbury)
2. Lay them out flat on the baking sheet
3. Slice about 2 inches down the middle of each breadstick on the top and bottom
4. Roll each end up away from the center
5. brush with butter and sprinkle with parmesian cheese and garlic salt (these are super healthy)

For the sauce:

You can of course buy pre-made Pizza sauce, but I just took one 8 oz. can of tomato sauce, and gave about two shakes of each; basil, parsley, oregano, thyme, and garlic salt. If you don't have all of these, at least go for the basil and garlic salt.

And there you have it...bones 'n' blood. Stay tuned for the fingers next!

P.S. Check me out today on A Happy Place Called Home, where my tissue paper canvases for Sienna's room where featured! Thanks Kelli!

Monday, April 25, 2011

Got Eggs?

Easter has yet again come and gone, and as expected, we have come upon a bounty of hard-boiled eggs. It seems that the hard-boiled egg is to Easter as Turkey is to Thanksgiving. Both are completely necessary in fulfilling long-lived traditions in each (though of course you can certainly celebrate Thanksgiving by just being grateful and Easter by remembering our Savior's sacrifice, I'm just saying that in most homes, this is a standing tradition for each), and both leave you with an excess of one type of food that you have no idea how to use up afterwards.

Now, of course, you can always just eat your hard-boiled eggs as is, but who really likes to do that over and over??? Then of course, there's egg salad sandwiches, (my favorite!!!) potato salads, or using eggs slicers to garnish any other salad. But what about after that? I mean, chances are, you've got like 24 hard-boiled eggs...

Well, that is where the incredible, edible deviled egg comes in! Oh my, I do love deviled eggs. In fact, I love them so much, that I love to get creative with them. You will find them at any party I put on, because to me, they're as wonderful and versatile as a cupcake. So many ways to decorate, and to tie into a theme, but SO much more satisfying! (I realize this is debatable, I could seriously hear the entire state of Utah gasp when I wrote this...but just put your "Sarah" cap on right now and wander with me through the wonderful world of possibilities for deviled eggs.)

Of course just a normal deviled egg is amazingly delicious, but there are so many things you can do with them to make them adjust to anything you are doing. You can use them for parties, for lessons, for snack time after teaching your kids a new song or reading a new story... the possibilities are endless! Below, I have a few examples of fun things you can do with deviled eggs, and chances are...you've got some hard-boiled eggs to practice with!

This was from Breck's Dr. Suess Birthday last year...Green Eggs and ham. The yokes are dyed green, and fed through a frosting tip. These can be for a party, but also for a Dr. Suess reading time with your kids.

Not many people realize you can actually dye the whites of your hard boiled eggs as well. If you use a strong food coloring (I like Wilton's) diluted in water, you can dump the egg whites in, and put them in the fridge overnight and have beautiful colors the next day! These were for Sienna's 2nd birthday party which was a watermelon theme. Once again, you could use these after a lesson about fruits (Ha ha, then give them eggs!), or just a fun summery treat. These have coarsely ground black pepper on top to resemble seeds, and the middle is dyed pink.

This one is a recreation of deviled eggs I did for Breck's 2nd birthday party. It was a bee theme, so I made deviled bees. I use mayonnaise as a sort of frosting for deviled eggs when necessary. I just dye it whatever color I need.

Devil's Eyes...blood shot of course.

Need a treat for a football game? Look no further. White and yoke dyed brown, non-dyed mayo for lines.

(Sorry, no Picture :( )

Basket: Use after reading "Little Red Riding Hood". I used paper for the handle, I couldn't really think of anything edible to stick in there.

Deviled egg boats. Use Single's slices of cheese, and cut an X all the way through.
Then cut  + after that. These will make your sails. You will get 8 sails from one slice.

Put onto a toothpick, and stick into the deviled egg.

I hope this has given you a few ideas for finding fun ways to use up your hard-boiled bounty. If nothing else, your kids will enjoy the fun things you come up with, and hopefully you'll have some too!

Friday, October 8, 2010

Potato Pancakes

Last Sunday I was really craving some Brinner, but didn't quite feel like just the average pancakes or scrambled eggs, or omelets, etc. One of my favorite places to go on a Saturday morning, pre-student life, was the Old European Breakfast House. My mouth is watering thinking about it. We literally lived less than a quarter of a mile from this magnificent place, so it became quite the Saturday morning tradition for us before we moved to Moscow.

I would always get the Scandinavian Cake Plate, the most mouth watering plate of any cake-like thing for breakfast you can think of. Among these cakes were potato pancakes. As I remembered this last Sunday, I realized what kind of brinner I was looking for. Some good ole deep fried potato pancakes!

I looked for a good recipe, and finally tweaked one for myself. The result??? Let's just say I'll probably be making these way more than I'll be willing to admit.

If you'd like to try it out, and if you think these cakes would be up your alley, here's the recipe:

Potato Pancakes

2 potatos, washed and shredded
3 eggs, beaten
1-2 (to taste) tsp. dry chopped onions
3 tbsp. flour
1 1/2 tsp. salt
1/2 cup oil of choice for frying

Optional extras:
Butter
Lemon juice
extra salt
Sour cream

Once your potatoes are washed and shredded, pat them dry with a clean rag, paper towel, or anything that will absorb the moisture really really well. Place dried off potatoes in a bowl and add next four ingredients. mix thoroughly.

Heat oil in a frying pan until it is hot. By large spoonful, drop potato mixture into the oil , and immediately flatten out, so it takes the shape of a pancake. Let it fry for a little until you start seeing the edges turn brownish. Flip over and let it get golden brown on the other side.

Take out of the pan and place on a paper towel (or two) to drain.

This part is optional, but oh so delectable:

While they are still hot, drizzle lemon juice on the top of them. Follow with buttering them like you would a pancake, then sprinkle with salt from a salt shaker after that. Then spread sour cream over the top as a "syrup".

I'm also pretty sure hollandaise sause would be amazing on these...but then again...what doesn't taste a thousand times better with Hollandaise???

Friday, July 9, 2010

Sienna's Watermelon 2nd Birthday Party!

Lots of fun, and pretty simple this party was. It was a bright, summery theme, and worked out perfect for my fruit-loving little girl! Here are some of the details:


The main table

The cake and cupcakes
Deviled watermelons - I hard-boiled the eggs, seperated the yoke from the whites, then dyed the whites in green food coloring over night. Meanwhile, I added pink food coloring to the yokes, though in the picture it looks orange. I then sprinkled coarsly ground black pepper over the top to resemble seeds.

Watermelon jell-o bites: Cut limes in half, gut them out, then pour in pink jell-o, and refrigerate. Once hardened, cut halves in half again.

The favors, goody bags, and personal watermelons to take home

Cake pops

The 2nd table
The spread of table #2, including watermelon salsa (and no, there are absolutely NO tomatoes in it!)

The drinks

The craft table: making watermelon music makers (shakers, with watermelon seeds on the inside)
Outside: The activities - First was this contest...

then this one. I used the rind rings for the ring toss, but if you do this, make sure they get used almost right away. Ours were sitting out for awhile, and got soft and soggy, and fell apart after tossing them.

The invites

The inside

Monday, April 26, 2010

You Can't Ride in My Little Red Wagon


I know in your head now you're singing the rest of that line...Well, once again, I'm sorry for being such a slacker...I really did mean to be more regular with posting, as I still intend to do, I think I just have a lot that I'm working on that were on-going projects, so nothing was getting done. Hopefully now I can really get on the ball and get some stuff posted.

One of the things I have been working on was this shower for my friend, Paige, and her upcoming baby boy.

The theme was "Little Red Wagon", and it was lots of fun (not to mention cheap!) to plan, and I got to plan it with my good friend Alyssa (alyssabittybowtique.blogspot.com)! We stuck to the color scheme of the wagon (red, white, black), adding in natural effects such as burlap, twine, and tin cans.We wanted to feel really little boyish, reminiscent of a little boy playing outside all day.

The food was centered around little boys too, we had apples with dip, PB&J squares, a veggi platter, and themed cake. We also had some food for our own tastes as well, including the famous shower "cucumber bread" and cinnamon bears!

For the activity, instead of games, we had everyone decorate a page for an alphabet book for Paige's little boy. It was fun, and it's a cute extra little gift for Paige!

For the decorations, I'll just post the pictures and explain:


The tablescape

Side View...by the way...those are root beers, I thought it would be cute to have old soda bottles, but it kind of ended up looking like we were having a keg in the pictures. 
Tin cans hanging with daisies

Some of the table

The cake...a joint effort :)

Beautiful Paige...also, there are some pictures I took of Breck's red wagon for decor...cheap and easy, and it totally added to the themed decor!

The Alphabet book table area. Alyssa and I thought this would have looked cuter with some pom poms hanging above it, but wouldn't you know it, all the red tissue paper in Moscow was sold out...unless you want to pay 7 dollars for a small pack at Michaels. 

close up

The favor table

The favors: little red wagons with dirt mounds in them!

Monday, March 29, 2010

Push-In Pie Crust


So I know I don't usually do recipes, but there are a few out there that I have either come up with, or found that have changed my life. Seriously, I will never be the same cook. I love cooking, I mean really really love cooking, so I'm actually surprised I've never ventured into online recipe sharing.

Funny thing is, I love to cook, but I can't stand baking. It's not so much that I can't bake, just that I don't like to bake. The only time I semi-enjoy baking, is when it accomplishes my OCD desires to have a completely coordinating party. Baking just seems so redundant to me... flour, sugar, eggs, butter, rising agent...every single time...then you shove it in the oven. No diversity, and it's messy, then to top it off, offers little nutritional value. Don't get me wrong, I like to eat baked goods; really, I LOVE to eat baked goods, but I never want to go through the mundane, messy and long process just to eat something that's not good for me.

Cooking is just so diverse. Not only are your ingredients limitless, with a change in one spice having the ability to change the entire taste of the dish, but there are so many ways to cook something, all yielding completely different outcomes. You can bake it, sauté it, boil it, steam it, deep-fry it, grill it, or broil it. Then, you get a rounded meal for you and your family, so everyone wins!

When it comes to the holidays, i love cooking big feasts for our family. My dread comes in when I think about the PIES I have to make! And here's my other quirk, I really like doing things from scratch when it comes to the holidays, so I set this standard of pumpkin pie from a real pumpkin, apple (among other fruits) pie not from a can, and of course, homemade pie crust.

I don't know if you guys have ever tried homemade pie crust, but it's a pain. It's not very hard or intricate, but it's just annoying to mix, and everything has to be done in a specific order and time. Speaking of time, it feels like it takes forever too. Like I mentioned earlier, I'm all for not spending a ton of my time baking. You can imagine my delight when I found this recipe.

It's completely from scratch, and takes no more than 3 minutes to make, and you mix it and make it right in the pie pan, so no messy counter, extra bowls, or sore arms from excessive rolling! Perfect! This recipe is good for pumpkin pies, pudding pies, or dutch pies. You can also use it to make quiche, but make sure you cut out the sugar. It's not your best bet to use this for a pie that requires a top, as the texture isn't right to hold as a top crust, but it really makes a yummy (and homemade) bottom crust.

So enough of the rambling... here's the recipe!

Push-In Pie Crust:


1 1/2 Cups all-purpose flour
2 tablespoons sugar (emit for quiche)
1 teaspoon salt
1/2 cup vegetable oil
2 tablespoons milk


1. Place dry ingredients in pie pan (8-9 inch) and mix together with a fork.


2. Slowly add oil, then milk. Kneed with your hands a couple of times to ensure consistency in texture.


3. Starting in the middle, start pushing the crust down to the pan, and work your way out, until there is a thin and even layer of crust on the entire pan.


4. For pudding pies (or a pie that you are just refrigerating, instead of cooking) you need to bake the crust first at 425 degrees for 10-12 minutes. If you are making a pumpkin pie or quiche, just pour filling into uncooked crust, and bake for whatever the recipe calls for.


And that's it! I hope you enjoy this recipe as much as I do. I at least hope you can enjoy the time it saves! Happy baking!!
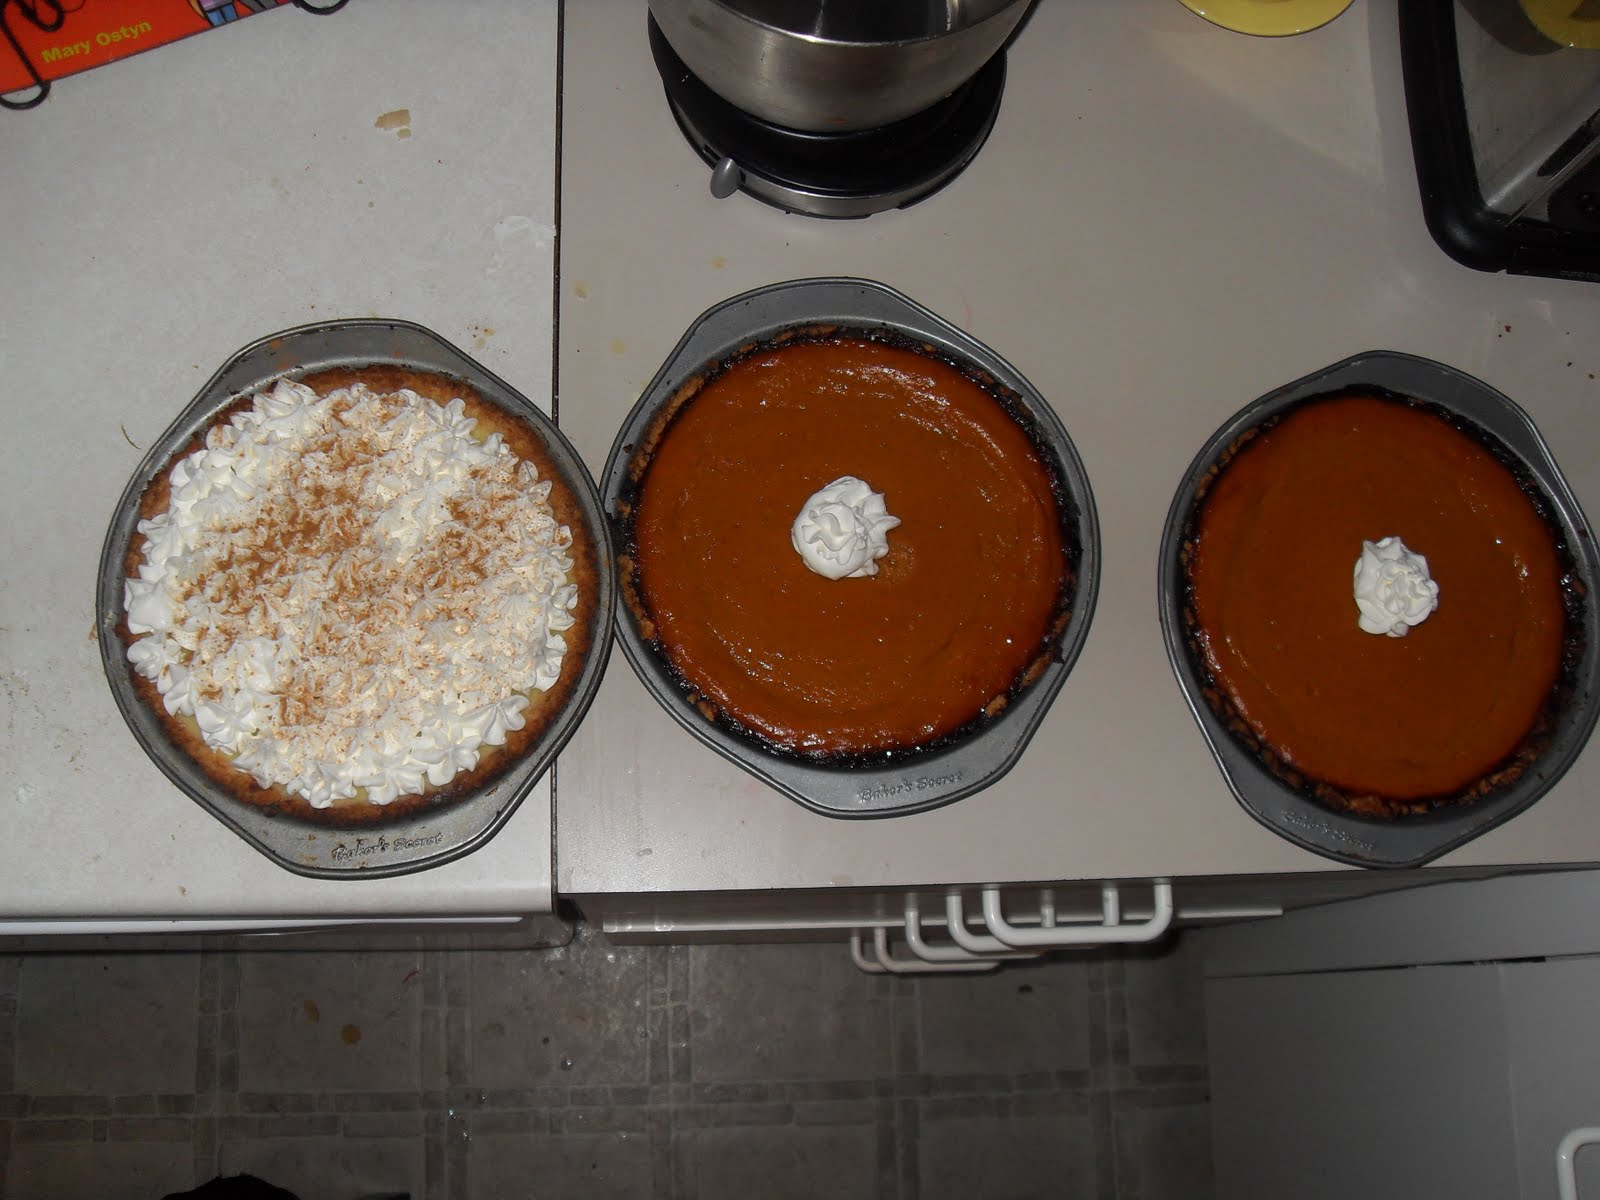
These 3 holiday pies were made with the Push-In Pie Crust!

Love,

Monday, March 22, 2010

Come Celebrate Breck's Birthday Suess Style!!!


Fun party, fun to put together, fun with friends and family....Glad it's over!!!

Well I lied in my last post saying the party was that weekend. It was supposed to be... until we all got sick the DAY BEFORE!!! UGH! So we put it off to the next week to ensure I could handle setting up, germs stayed within our own family, and of course that Breck can actually enjoy his party!

I've had this party planned for over a year, hoping long ago to have it as Breck's 2nd birthday party, then realizing he would never remember it, and wouldn't be able to participate in the activities, I decided to wait until his 3rd birthday. It gave me a lot of time to think up new ideas in addition to the ideas I had originally had, find new ideas online, and prepare and create! Some of my ideas came from this great site that I found amidst all the planning, using Dr. Suess as the theme for a baby shower. I got some of the decor ideas from her!

We reserved the clubhouse at our complex, so we could have enough space for everything and everyone, and it worked out perfect. The rest of the details I'll just let you look through yourselves in pictures, and I'll explain as I go.
The central point of the tables.
The right table

The left table

Pin the Hat on the Cat (and story books to read below)

Station to decorate Sneetch Stars that the kids could pin on their shirts! (Next to it, though I didn't get a better picture, is Max from the Grinch, and just a little over to the right from him was a sled with all the presents on it!) 

The "Who-Ville Skyline". I bartered with an elementary school for the butcher paper. They had pity and gave it to me for free.

"Make a Dust Speck Clover" station from Horton Hears a Who!

McElligot's Pool (Fishing for prizes), and sign.
Books laid out, and presents sled in the background.

I had some pages from Suess books blown up and put them up around the place.

Sorry this is so blurry, but these are the favors. They are bookmarks with Oobleck behind them. I made a bunch of gak, and put it into cellophane bags as oobleck to take home and play with! The bookmark has a poem from the book "Bartholomew and the Oobleck" on it.

Cat in the Hat style Bow ties for the kids to wear in place of party hats!

The Food: Here you see Green Eggs and Ham...(I also made those ball center pieces with Styrofoam balls and wooden skewers)  

This picture speaks for itself

Thing one and Thing two cupcakes, an idea I got from the afore-mentioned site.

McElligots Pool (Jello with Swedish fish inside and on top)
Another self-speaking picture. I drew this little guy, and was pretty happy with how he turned out. I also drew Max (from the Grinch), and the Pin the Hat on the Cat poster.

The cake table


Me reading "Happy Birthday To You!" by Dr. Suess. My little man is in the plaid.
Blog Widget by LinkWithin