Projects on My Plate

  • Veda's Birthday Party
  • Sienna's Birthday Party
  • Sienna's Pencil Skirt
  • Pencil Skirt
  • Wardrobe re-do
  • Floral Skirt for Mommy
  • Breck's Bedding
  • Sienna and Veda's Bedding
  • Apron

Thursday, September 24, 2009

Re-fashioning

Okay, I don't know about you guys but, though fun, shopping can be a bit frusterating for me. I get ideas in my head of how I want an outfit to look, what exact outfit I would want (without ever actually seeing it somewhere), then of course, I can't find anything close to it, when I go shopping. So I decided to start making over clothes myself. This is the first of many more projects to come like this. It will be done by buying cheap clothes that have basic lines, or a basic shape that I am looking for, and I will be using extra pieces of fabric either from the same garmet, or from a duplicate that I buy.

This one was my first; very easy, and very pleased with the outcome.

I bought this shirt at Ross for 4 bucks.


Then I cut the entire turtle-neck off (to be used as my extra fabric).
I then cut 3 1 1/2 inch thick strips from the spread out turtle neck fabric, then folded and pinned them to the neckline in this pattern (if you're looking down at the edge of the strips)


I then just sewed one straight line through the middle, at the neckline, and voila!

Thursday, September 17, 2009

Are Those Pants...or a Skirt???

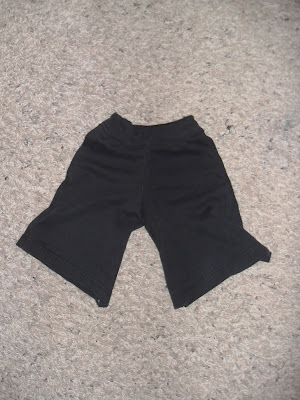
They're Gaucho pants! I decided to make some for my little Sienna Buggeroo. She was lacking in the pants department, and since I think gauchos are pretty much the most comfy pants in the entire world, I decided to introduce her into their lovely world! I got this idea from another site, but forgive, me, I can't remember where, I happened to be craft-blog-surfing, and forgot where I was at, but if any of you know where these are from, please let me know! Anyway, the great thing about these gauchos, is that you make them from an old shirt that you don't wear anymore! You'll need some measurments of your little girl; you'll need the waist, the hips WITH the diaper (if not potty trained), the distance from croch to waist, and the inseam to where you want the pants to hit at on her leg. So here we go:

1. Get your measurments
2. Find an old t-shirt (with enough material to cover your measurements), and lay it flat, smooth, and all the seems where they should be.
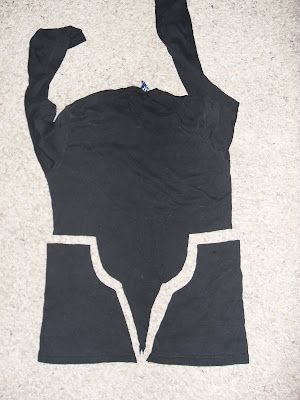
3. Cut the shirt (through both sides) as pictured below. Make sure the part that will hit her hips is 1/4 the measurement of the diapered-hip measurement. Each top cut should measure 1/4 of the waist. The curved line should be the croch/waist measurement, and from the tip of the curve down to the bottom should be the inseam measurement.


4. Unfold each piece and place together, wrong sides out.
5. Sew together at the curves only
6. Now re-position the pieces so that the curved seems are both in the middle of the front and the back.
7. From this point you should be able to see the pants shape, so then you sew each leg up to the croch, or curved seems.
8. Flip it back so that the right side is out, and you pretty much have it, except for the top.
9. What I did for the top was, I sewed elastic (cut to about an inch smaller than the waist measurement) to the top of the waist in a smocking fashion. Then I cut out some more of the shirt to make a "binding" to cover the top of the waist.
10. There you have it! Now put them on your little girl and admire!


The Top Binding

Tuesday, September 15, 2009

Kreative Blogger Award


The Rules:
1. Thank the person who nominated you for this award.
2. Copy the logo and place it on your blog.
3. Link to the person who nominated you for this award.
4. Name 7 things about yourself that people might find interesting.
5. Nominate 7 Kreativ Blogger.
6. Post links to the 7 blogs you nominate.
7. Leave a comment on each of the blogs, letting them know they have been nominated.

Thanks to Suzi from "Suzi Homemaker" for this lovely award!

Okay, for the 7 things... I'm not very interesting, so this should be... uh, interesting...?

1. I'm on an anti-hair dye spree. I'll likely start dying again at some point, but for now I'm determined to have my natural hair color (and not DYED to my natural color) the only color on my head, for the first time since 6th grade. Which means right now I'm a half-head, with roots down below my eye-balls, but hey, I read an article about celebs purposly getting their hair dyed with roots... so I write it off like I'm just REALLY in style! Seriously though, I'm lately all for anything natural looking.

2. I can get my 1 year-old daughter's hair into a messy bun with no clips! She's amazing.

3. I'm crazy about food!!! It's no wonder I am going into nutrtion! Nothing makes me more mad than diets! (And by diets I mean fad diets, or celebrity diets, not the sort of diet , or meal-plan a doctor puts you on because of a health issue) Food is NOT an enemy! Food is our firend, and can do marvelous and amazing things if we know how to use it properly. Too much of ANYTHING is bad, so of course over-indulgence on certain types of foods can have a negative effect, but when we know how to use different foods in the right portions, they can strengthen us, give us more energy, keep us from getting sick, and even in some cases, fight diseases! Food is so amazing, and I love learning about it so much!

4. I had serious pride issues when learning how to knit. I had crocheted for 8 years, so going again through the process of uneven rows, loose stitches, dropped stitches, added stitches, etc. really threw me for one. I'm just not used to not knowing what I'm doing when it comes to yarn crafts, so I had some major pride issues to get over. Luckily, I overcame, and I'm now secure in my sloppy knitting!

5. I still get so giggly everytime one of my kids toots.

6. I LOVE LOVE LOVE to read!!!! I go through cycles of the kind of stuff I like to read. I love reading religious and political non-fiction, religious fiction, historical fiction, and romantic ficiton (not the trashy romance novels though). Thanks to my mother-in-law, I am currently on a Jane Austen spree, which I can't seem to get enough of! I'm such a library junkie!

7. I've seriously had Breck's 3rd birthday party planned since before his 2nd birthday party. I know. I'm insane.


And now for the nominees:

(I don't know too many creative people who have blogs for their crafts AND who haven't already recieved this award, so I will probably nominate people who don't have craft blogs, and maybe some who don't even have any blog!)

1. Chelsea Peterson from Chelsea's Crafts

2. Lindy Walker and Alise Wrigley from Lindy Lou and Baby Too!

3. Alyssa Stevens, she doesn't have a craft blog, and her regular blog is private, but let me tell you, she makes amazing bows!!!

4. My Sisters-inLaw, Shasta Baisden, and Shawnte' Morton. They don't have craft blogs at all, but if they did, you'd be blown away at their amazing skills!

5. My Mother-in-law Sherry is an amazing seemstress. She made her own wedding dress, not to mention tons of dresses, diaper bags, etc. for all of us, our weddings, and babies!

6. Erika Allred at Red's Vinyl Lettering. She makes some awesome decorations with her vinyl lettering!

7.Okay, I'm actually going to just tell you to visit the blogs of anyone in my ward in Moscow, which you can find by going onto my family's blog and clicking under any of the "moscow Friends" because they are ALL so creative, and they all SHOULD have blogs for the stuff they make!

Thursday, September 3, 2009

Sienna's Crib Bedding... FINALLY done!!!!

You may have noticed that it's been awhile since I have posted. Here is my excuse.. I've been working on THIS baby for awhile! I wanted to take my time with it, so it wouldn't stress me out, and so I could pay attention to detail. Well, I finally put the finishing touches on this morning, so I'm happy to announce, this bedding is DONE!

I did it a bit differently than I did Mary's crib bedding. The bumper I sewed, then stuffed like a pillow with normal "stuffing", then I tufted it in the middle to give it a more flat appearance. I used ribbons to tuft it.

The crib skirt I scallopped at the edges of the tan. I have a scallopping option on my sewing machiene, so I used it along the edge, then cut in a scallopped shape around it.

The blanket is pretty self-explanitory, but I did reinforce the smaller squares by sewing over the top edges as well, before attaching to other side and batting.

All of the measurements are the same as the bedding for Mary.

This was a lot more fun to do because I was not rushing myself, and probably because I was more familiar with what I was doing. I have been in full force re-doing Sienna's room, so stay tuned for other projects that I am doing for it.


The Ribbon-Tufting

The Blanket

The Skirt with scallop detail... I'm obSESSED with scalloping!
Blog Widget by LinkWithin